Showing posts with label holiday. Show all posts

Saturday, April 26, 2014

DIY Gift for Mom!

Wow! It's been a really long time since I blogged. It is completely my fault and I promise to not do it again (for awhile). K and I are still transitioning to our new lives of commuters and spend about 4 hours in the car each day. Sometimes that goes up to 5+. SO, we are searching for apartments, which is harder then it sounds in Chicago. We have our eyes on two in particular, so fingers crossed we will have one of these as our new home soon.


Anyway, because I have been so busy I thought I would come back with a good Mother's Day Gift tutorial. My dear friend April, made me a jar of Bourbon Vanilla Tea Bags and a bag of Birthday Cake Tea Bags for my birthday. It was a such a sweet and tasty gift, so I did some digging and found out how to make my own teabags for all my loose leaf tea. Of course, April made hers way better then mine, but here's my tutorial below.

What you need:
  • Coffee filters
  • Loose leaf tea- do NOT use cut tea bags, usually those leaves are too small
  • Cardstock
  • Scissors
  • twine
  • stapler
So here's how!

Cut the filter paper so it makes a rectangle.


Put two small scoops of tea in the rectangle, with space in the middle. Then fold up both sides of the rectangle to the middle, so the tea is closed in.
Once you fold both sides to the middle of the rectangle. Place your finger in the middle of the two tea piles and fold the ends up to the top. (Can you see the tea forming now??)


The tea should be pretty secure with all of your folds, so fold the open top into a triangle. Then fold the triangle down so that it lays on top of the teabag.


Cut a fun shape with the card stock. Attached twine by tying then stable to top of the teabag.


I made my teabags out of apple cinnamon chai and gave them to Keith to take to work. I'm sure he loved all the hot pink hearts I made for the tags.

Happy crafting! :)
 

Thursday, March 13, 2014

Spring Wreath

I give you the next installment for Craft Month, my spring wreath! 

Look at how cute this is!


 What you need:
  • A wreath blank
  • green fur yarn
  • flower ribbon
  • hot glue gun
  • scissors (not shown)


To start, hot glue the end of the fur yarn to the Styrofoam wreath mold. Then start wrapping. This project take patience. A LOT of it. Every few inches put a drip of hot glue on the back and wrap the fur yarn over it. Careful not to burn your fingers on the hot glue. (I did...)

Keep wrapping and gluing. Every once in awhile run your hand over the fur that is already wrapped around to fluff up the fur. 

Keep repeating

And repeating....

Once you finish wrapping the wreath, cut out the individual flowers. I cut out around 12. Hot glue them to the front of the wreath, wherever you would like. Then tie on a ribbon to hang and:

Ta-DA!

This project does take time and patience. I really enjoyed it though and the final product is just so cute. Happy crafting!


Monday, February 17, 2014

Valentine's Float


I'm a little late to the party. Apparently Valentine's Day was last Friday. I spent it at work, then last minute cleaning, and finally with Keith and Megan! But anyway, Keith came in the door with a bottle of wine and flowers yelling Happy Valentines. I got him a nerf gun and coffee. True.LOVE

I am a big fan of ice cream, so we made this Valentine's Float. It's really easy and realllllly tasty.

Put two scoops of ice cream into a cup, fill the rest with cherry 7Up. Top with whipped cream and a cherry. DELICIOUS!


Saturday, December 14, 2013

Gift Idea: Monogram Mug

So, I found this cute little pin on pinterest, however every time I saw it it had no link to a directions page. So, I kept putting off trying it. Well, I decided to give it ago, so that I can make someone a special gift this holiday.
It's really easy and really cute. I hope the person who is getting this, likes it!

So here's how to do it:

You need:
  • a sharpie, I used gold
  • A white mug, got mine cheap from Target
  • a letter sticker, found mine in the scrapbook section
Stick the letter to the mug. Slowly start putting small dots, using the tip of the sharpie to outline the letter.


Keep going until you have outlined the whole letter. Then start on the fancy designs you want to make. Like this:
Then once you are done. Peel off the sticker and discard. Then put the mug in the oven at 350 for 30 minutes. Keep an eye on it though. Then pull it out and let it cool down for one hour before giving it a quick wash by hand. This lovely gift is a handwash only present :)

Anyway, happy making! :) 


Tuesday, December 10, 2013

Gift Idea: Dark Chocolate Gummy Bears


One day, I walked into a small candy shop and saw a bag of chocolate covered gummy bears. Thinking Keith might like them, I bought them, then quickly ate the entire bag. NO JOKE. They were delicious. So, I decided it was time to make some to give out as a small gift for some friends. So, here is the recipe. They sound weird, but really they are quite delicious.

Melt that chocolate. I used dark chocolate and my fancy chocolate melter. You want a smooth consistency, without it burning. Using the microwave is tricky, because chocolate can end up burnt quickly.

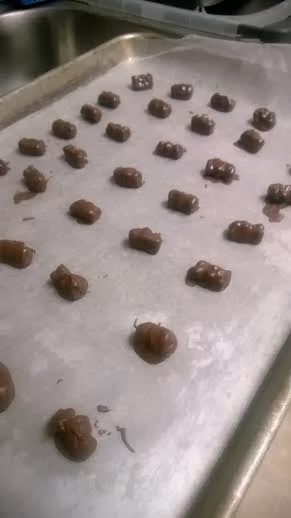
Once it's melted, drop in a gummy bear. Be careful not leave it in too long, or it will get gummy and melt. I used a fork to flip it over and cover it with chocolate goodness.

To look like this beauty.

Place on waxed paper to dry. They might not be the prettiest thing I ever made, but man they taste pretty good. I plan on wrapping them out and giving them out to a few people who like candy almost as a much as I do.

I plan on posting a few other gift ideas for the upcoming holidays. So keep an eye out! Happy making :)