My mom was one of those people who decorated for holidays. I often hated helping to decorate, but I loved once it was out. Living in an apartment, I never really decorated for any holiday. Maybe a small thing here or there, but I am getting better at it. Right now I have THREE pumpkins, and a few other Halloween items around the apartment to get us in the festive mood for the upcoming holiday.One of these things is my new wreath that Keith loves. It's a mummy wreath!
It was so easy to make and really fun! It's made out of a foam wreath base. I wrapped bandages around it, gluing in several pieces to hold tight. After I made it all the way around, then wrapped it across both sides to create the "face" space. I then attached big goggly eyes and let it dry.
It is a silly and adorable wreath that is bring some Halloween spirit (although goofy) into our living room. More fall (and Halloween!) items coming soon! I promise.
Showing posts with label diy. Show all posts
Wednesday, October 22, 2014
Sunday, July 13, 2014
D.I.Y. Permanent Marker Dyed Scarves
I have had several silk scarves for two moves now and when I started to unpack in my new apartment, I finally found them and decided to do something with them. So I invited my friend Erin over and we decided to craft- so we dyed silk scarves with permanent markers.
This is an easy craft but a beautiful craft. All you need is a silk scarf, I got mine here, permanent markers, isopropyl alcohol and a dropper. I also used garbage bags/table clothes to protect the table.
First things first, iron the wrinkles out of your scarf, then fold scarf into a triangle.
Then start creating whatever pattern you would like with colors. Make sure the ink goes all the way through to the back of the triangle.
I unfolded the triangle and added more color where I felt it was lacking. I also rubbed the ink into the silk. It dyes your fingers, but I thought it really worked.
Once I liked the designed, I refolded it into a triangle and went outside. This next part is a bit strong smelling- so do it outside or in a well ventilated area.
Once outside (and on some protective tablecloth/garbage bag) use a dropper to get out some isopropyl alcohol and slowly drop the alcohol on the ink.
The ink will spread out, so continue until its well spread and looks the way you want it to.
I flipped it over and did both sides. You might even need to open it and continue to drop the alcohol to spread more of the ink.
Erin made a scarf too. How beautiful!
Let your scarves dry. The alcohol will dry quickly. Once it's dry, iron the scarf. I put a sheet between the iron and the scarf so it did not melt, but it really worked.
This is the final project. Turned out great! This is a hand wash only project. I just washed mine this morning and it bleed just a small amount but the pattern stayed intact. This project was really fun. I can't wait to do it again.
Happy crafting!
This is an easy craft but a beautiful craft. All you need is a silk scarf, I got mine here, permanent markers, isopropyl alcohol and a dropper. I also used garbage bags/table clothes to protect the table.
First things first, iron the wrinkles out of your scarf, then fold scarf into a triangle.
Then start creating whatever pattern you would like with colors. Make sure the ink goes all the way through to the back of the triangle.
I unfolded the triangle and added more color where I felt it was lacking. I also rubbed the ink into the silk. It dyes your fingers, but I thought it really worked.
Once I liked the designed, I refolded it into a triangle and went outside. This next part is a bit strong smelling- so do it outside or in a well ventilated area.
Once outside (and on some protective tablecloth/garbage bag) use a dropper to get out some isopropyl alcohol and slowly drop the alcohol on the ink.
The ink will spread out, so continue until its well spread and looks the way you want it to.
I flipped it over and did both sides. You might even need to open it and continue to drop the alcohol to spread more of the ink.
Erin made a scarf too. How beautiful!
Let your scarves dry. The alcohol will dry quickly. Once it's dry, iron the scarf. I put a sheet between the iron and the scarf so it did not melt, but it really worked.
This is the final project. Turned out great! This is a hand wash only project. I just washed mine this morning and it bleed just a small amount but the pattern stayed intact. This project was really fun. I can't wait to do it again.
Happy crafting!
Thursday, July 10, 2014
D.I.Y. Word Wall Art
I don't read as much as I used to. I should, and I will try to work on that. Maybe I will set a goal- 15 books for the rest of the year. Is that a lot? I feel like I don't know because some books take me a day to finish and others seems to hang on with me for weeks. So, 15 minimum. Deal? I will keep you posted on my progress.
I have declared my love on this blog for a certain Mr. Hemingway. I still love him, don't worry. However, I was putting away some books and a few Vonnegut books appeared. I forgot how much I love Slaughterhouse-Five. I have kept this worn copy since high school. So, when I was thinking of wall art and thought of doing a simple word wall art- a light bulb went off in my head. So, I ran to the craft store (okay- I took the train to the craft store) bought small wooden letters, 2 different kinds of paint, a thin paint brush and all purpose glue. I had canvases at home. I headed back on the bus (don't ask!) and got to work once home.
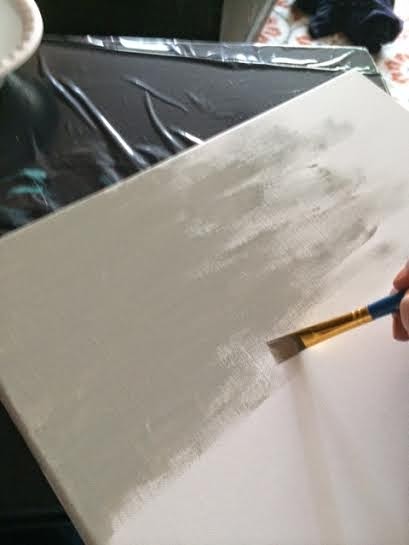
I wanted a lighter background- so that the letters were a little more dramatic. I also didn't want you normal straight paint job. So I got creative. I did one coat of the gray paint on the canvas.
Once it dried, I laid out my pattern- then glue them on individually. I let that dry, and there you have it a new wall art!
It's a bit dark-a bit weird, but I like it. It's a good reminder.
Okay, well this is my easy wall art. I really enjoyed making it.
Happy crafting!!!
Labels:
art,
art project,
canvas,
d.i.y.,
decor,
diy,
home decor,
paint,
wall art
Sunday, October 6, 2013
D.I.Y. Upcycle T-shirt Scarf in under 10 minutes
That's right, I said it. A t-shirt scarf in under 10 minutes. Even the crafting challenged can do this easy project. I made a few for my mom and aunts last Christmas, and they all really liked them. Ignore the bad photos to go along with this post though, we are still getting our house into livable shape AND photographing your own project is a skill I need to work on.
Materials: This is easy!
- good scissors
- a t-shirt. I would recommend the larger the better, this was an X-L I thrifted and washed. I also recommend one without a logo/printed on, that stiffness that usually comes with design/logos make ones of the steps really hard.
Lay the shirt flat, cut the hem off at the bottom and set aside. This project is so easy, you don't even need straight cuts.
Start on the left side of the shirt and cut horizontal strips about 1 inch thick. Again, they do not have to be terribly even. Cut until you reach a pocket/design/or sleeves and discard top half.
It should look like this when you are done.
Take each strip and pull on them gently. These will make them longer and roll them so make them fit better in your scarf. Make sure to do this to every strip, and pull until it is the length you want.
Remember that hem from the beginning? Yeah, bring that back and cut it on one side to make one large strip. Bunch all the stretched strips together and at the back tie the hem around the bundle. Just make a simple tie, with a long enough ending that sticks out to end the scarf. Then start wrapping the hem around the bundle. I usually do about 5 wraps.
Then tie the lose end of the hem to the original knot end of the hem sticking up. Cut off excess and tuck strips under the wrap.
This is the finish product folded in two.
Here is it is on me, after a long day, hence the hair.
Anyway, this project is really simple. The hardest part is the hem wrapping, which once you get it is a breeze. Enjoy making these bad boys for the upcoming cold weather (let's hope! 80 degrees in October is just wrong!)
Subscribe to:
Posts (Atom)