Showing posts with label easy. Show all posts

Tuesday, August 19, 2014

Recipe: Jazzin' up Freezer Rolls

This week has just felt off. Keith is sick and I have been feeling a bit restless. I miss crafting, but am waiting until my craft room is full set up to start making creative messes again. The last few nights have been spent with a quick walk, watching old shows on netflix, lounging on the couch and making food we have had in our freezer for too long. 

So tonight was no different, however I wanted to liven up some frozen rolls I had to go with our ravioli and meatballs.

So I present to you: easy jazzed up rolls

These are boring old freezer rolls. Remove the plastic cover. Preheat the oven to the directions that come with the rolls- ours was 325 degrees. While it preheats, spray on olive oil (we have this handy thing), sprinkle with sea salt, black pepper and seasoning (I used a mix of Italian Seasoning from a local spice shop).

Lookin' Good


Bake the bread to the packaging instructions.

Once baked, eat it up! It's a really good and easy way to make freezer rolls even better! Enjoy!


Friday, April 11, 2014

A Warm Up Weather Recipe

It's warm! Today reached 70. I can feel summer in the air and it's glorious. I celebrated by buying and planting new plants while listening to records today. It was magical. This weather gets me so ready to go for walks, camp in the woods, eat on the porch and of course, enjoy nice tasty popsicles!

Keith and I invested in a Zoku Quick Pop Maker. And, it's amazing. I toyed around with it for a bit, and thought I would share my favorite recipe: Orange Julius Quick Pops.

What you need:
  • 6 ounces of thawed orange juice concentrate
  • 1 cup milk (I used fat free)
  • 1 cup water
  • 1/4 cup sugar
  • 1 tsp. vanilla
Mix all ingriedents in a bowl until well blended. Pour into the Zoku and wait about seven minute, until frozen. Remove with the tool and devour.

Enjoy the warm weather (and the delicious Popsicles!) 

Thursday, February 20, 2014

Recipe: Chicken Roll Ups


So when Megan came to visit me, we kind of pigged out. We would have some ice cream, then twenty minutes like some snacks, then maybe some wine. This is what happens when you can just hang out, craft and be goofy all day. So, I was starting to get a bit hungry before dinner, so I made these quick and easy chicken roll ups that I came up with one day when my pantry had too many cans of chicken, and I had no no idea what to do with them.

The recipe doesn't require much:
  • 1 can of chicken, this was too big, I would use a normal size
  • some shredded cheese, I picked mozzarella
  • one tube of crescent rolls
  • some seasoning. I use this blend, but basil is also delicious
They are also really easy to make:

First, preheat the oven to whatever the crescent roll packaging says to. I believe it was 375, but don't quote me on that. Then spray a cookie sheet with non-stick spray. Next drain your chicken and break up large chunks. I miss the seasoning with a little pepper with the chicken in a bowl.

Unroll your crescent rolls and break them apart. I find it's easiest to line them up on a separate tray from the one I am cooking on.

Lay a layer of cheese down. You can put as much or as little was you want.

Next add some chicken on top of the cheese.

Roll it up. and repeat. Bake for the amount of time on the crescent tube. and when you pull them out, you get delicious and easy chicken roll ups.


Enjoy!


Thursday, February 13, 2014

How to: fabric button bracelet

You guys! Today we hit our 1000th blog view!!! How exciting! and what's more excited then that? TOMORROW, Megan is coming to visit me. So that means the two lovely ladies of this blog will be together again! (even if just for a weekend) I am so excited. A weekend of crafts and fun catching up. I cannot wait.

I have been really missing crafting and creating lately. I used to make so much jewelry, but lately I have found it hard to get started and really uninspired. But! This week I finally had a great idea for a different type of bracelet. I kind of loved how it turned out. I plan on making more and in bright colors. But I thought I would share this easy bracelet with you all. So, let's get started.

I know you are asking, "Oh man, Jenn that is cool. How can I make it?"
Well, it's easy!!!

You need:
  • A fabric button kit, large size
  • a chain bracelet blank 
  • Strong glue
  • fabric (not pictured)
  • pliers (not pictured)
Use your pliers to remove the part of the button that is sticking out. I found it easiest to squeeze the inside part and pull out the loop from the top. Repeat with all 6 buttons in your button kit.

Cut the fabric you want to size given to you on the button kit box. My template was located on the back of the box. It will usually say where it is in the kit.


Then take the fabric and place it pattern down in the plastic mold. Place the rounded top of the button down next. Let the fabric bunch, and between the fabric bunches and the rounded part of the button lay the bottom of the button down.

Then push down hard.

Continue to you get all your buttons done. I did 6 since my bracelet had 12 blanks, so two blanks per button.

Then glue on each button. Again, 2 blanks per button.

Let it dry face down. It took a few hours.

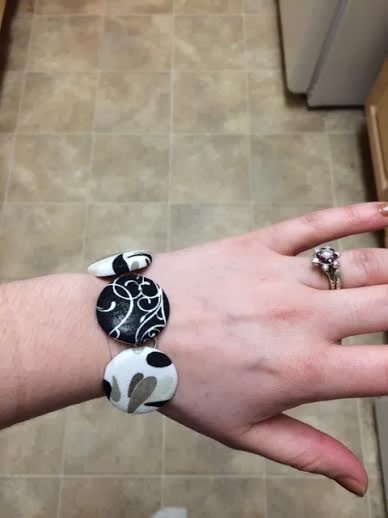
Finished product!

Sorry, I am trying to figure out my camera. My photos are too dark, but I hope you get what I was trying to show.

Happy crafting!


Sunday, February 9, 2014

Recipe: crockpot pork chops

You guys! I made the best dinner ever yesterday. So, Keith has been REALLY busy this semester with his promotion at work and a harder semester at school and now, his show got picked up for another run; we barely see each other!So, I haven't felt like cooking much for just one and I have been making easy food. So, this weekend I wanted to try something new (and still easy)


Okay, I didn't take any photos of the making, just the finished product. So, here's what you need!


  • 4-6 pork chops (I got boneless)
  • 1 can of cream of chicken soup
  • 1 can of chicken broth (we got organic, low sodium)
  • 1 packet of brown gravy
  • 1 packet of onion soup 
  • Crockpot


Put the pork chops in the bottom of the crockpot.  In a bowl, mix the other ingredients together until its all blended. Pour the mixture over the pork chops. Cook in the crockpot for about 8 to 10 hours on low, or until the pork is tender and ready to fall apart. I cooked ours for 8 hours on low. Then I also served with homemade mashed potatoes and zucchini.  Of course use the gravy from the crockpot on top of the mashed potatoes. DELICIOUS.

Keith said this is one of the best meals I have ever made and it was so so so easy.

Anyway! Enjoy.

Friday, January 17, 2014

D.I.Y. Sparkle ring

I have a jewelry business. I used to be so active in it and do craft shows and sell a bunch of etsy, but I got pretty busy. I haven't made anything new in a really long time, and got a bit antsy. So! I decided to make this really cute and simple ring! All you need is three, YES THREE, items to make it too.

All you need is Mod Podge dimensional magic, fine glitter, and a ring blank. The ring doesn't need to have a deep bezel, but it should have an indentation. I also grabbed a paper cup and cut a slit in the bottom, and I used it as a ring holder. Anyway, put a thin layer of the mod podge dimensional magic down and then sprinkle the glitter on it. Then let it dry over night. Shake off the excess glitter, and then put another thing lay of the mod podge dimensional magic down. It appears white-ish, but it will dry clear. It takes a few hours to dry, then you have a brand new ring.

Anyway, this is what it looks like! How cool is this


Happy crafting!

Sunday, October 6, 2013

D.I.Y. Upcycle T-shirt Scarf in under 10 minutes

That's right, I said it. A t-shirt scarf in under 10 minutes. Even the crafting challenged can do this easy project. I made a few for my mom and aunts last Christmas, and they all really liked them. Ignore the bad photos to go along with this post though, we are still getting our house into livable shape AND photographing your own project is a skill I need to work on.

Materials: This is easy!
  • good scissors
  • a t-shirt. I would recommend the larger the better, this was an X-L I thrifted and washed. I also recommend one without a logo/printed on, that stiffness that usually comes with design/logos make ones of the steps really hard.
So now what do I do? 
Lay the shirt flat, cut the hem off at the bottom and set aside. This project is so easy, you don't even need straight cuts.

Start on the left side of the shirt and cut horizontal strips about 1 inch thick. Again, they do not have to be terribly even. Cut until you reach a pocket/design/or sleeves and discard top half.

It should look like this when you are done. 

Take each strip and pull on them gently. These will make them longer and roll them so make them fit better in your scarf. Make sure to do this to every strip, and pull until it is the length you want. 

Remember that hem from the beginning? Yeah, bring that back and cut it on one side to make one large strip. Bunch all the stretched strips together and at the back tie the hem around the bundle. Just make a simple tie, with a long enough ending that sticks out to end the scarf. Then start wrapping the hem around the bundle. I usually do about 5 wraps.

Then tie the lose end of the hem to the original knot end of the hem sticking up. Cut off excess and tuck strips under the wrap. 
 
 
This is the finish product folded in two. 

Here is it is on me, after a long day, hence the hair. 

Anyway, this project is really simple. The hardest part is the hem wrapping, which once you get it is a breeze. Enjoy making these bad boys for the upcoming cold weather (let's hope! 80 degrees in October is just wrong!)