Showing posts with label fabric. Show all posts

Thursday, February 13, 2014

How to: fabric button bracelet

You guys! Today we hit our 1000th blog view!!! How exciting! and what's more excited then that? TOMORROW, Megan is coming to visit me. So that means the two lovely ladies of this blog will be together again! (even if just for a weekend) I am so excited. A weekend of crafts and fun catching up. I cannot wait.

I have been really missing crafting and creating lately. I used to make so much jewelry, but lately I have found it hard to get started and really uninspired. But! This week I finally had a great idea for a different type of bracelet. I kind of loved how it turned out. I plan on making more and in bright colors. But I thought I would share this easy bracelet with you all. So, let's get started.

I know you are asking, "Oh man, Jenn that is cool. How can I make it?"
Well, it's easy!!!

You need:
  • A fabric button kit, large size
  • a chain bracelet blank 
  • Strong glue
  • fabric (not pictured)
  • pliers (not pictured)
Use your pliers to remove the part of the button that is sticking out. I found it easiest to squeeze the inside part and pull out the loop from the top. Repeat with all 6 buttons in your button kit.

Cut the fabric you want to size given to you on the button kit box. My template was located on the back of the box. It will usually say where it is in the kit.


Then take the fabric and place it pattern down in the plastic mold. Place the rounded top of the button down next. Let the fabric bunch, and between the fabric bunches and the rounded part of the button lay the bottom of the button down.

Then push down hard.

Continue to you get all your buttons done. I did 6 since my bracelet had 12 blanks, so two blanks per button.

Then glue on each button. Again, 2 blanks per button.

Let it dry face down. It took a few hours.

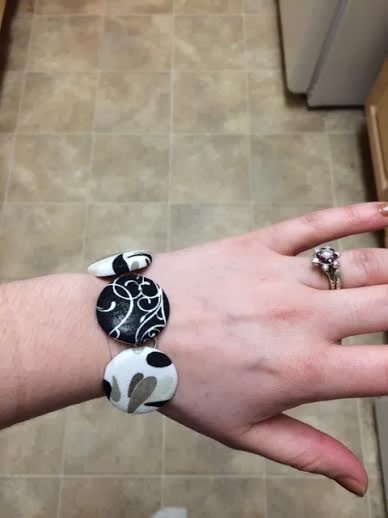
Finished product!

Sorry, I am trying to figure out my camera. My photos are too dark, but I hope you get what I was trying to show.

Happy crafting!


Sunday, October 6, 2013

D.I.Y. Upcycle T-shirt Scarf in under 10 minutes

That's right, I said it. A t-shirt scarf in under 10 minutes. Even the crafting challenged can do this easy project. I made a few for my mom and aunts last Christmas, and they all really liked them. Ignore the bad photos to go along with this post though, we are still getting our house into livable shape AND photographing your own project is a skill I need to work on.

Materials: This is easy!
  • good scissors
  • a t-shirt. I would recommend the larger the better, this was an X-L I thrifted and washed. I also recommend one without a logo/printed on, that stiffness that usually comes with design/logos make ones of the steps really hard.
So now what do I do? 
Lay the shirt flat, cut the hem off at the bottom and set aside. This project is so easy, you don't even need straight cuts.

Start on the left side of the shirt and cut horizontal strips about 1 inch thick. Again, they do not have to be terribly even. Cut until you reach a pocket/design/or sleeves and discard top half.

It should look like this when you are done. 

Take each strip and pull on them gently. These will make them longer and roll them so make them fit better in your scarf. Make sure to do this to every strip, and pull until it is the length you want. 

Remember that hem from the beginning? Yeah, bring that back and cut it on one side to make one large strip. Bunch all the stretched strips together and at the back tie the hem around the bundle. Just make a simple tie, with a long enough ending that sticks out to end the scarf. Then start wrapping the hem around the bundle. I usually do about 5 wraps.

Then tie the lose end of the hem to the original knot end of the hem sticking up. Cut off excess and tuck strips under the wrap. 
 
 
This is the finish product folded in two. 

Here is it is on me, after a long day, hence the hair. 

Anyway, this project is really simple. The hardest part is the hem wrapping, which once you get it is a breeze. Enjoy making these bad boys for the upcoming cold weather (let's hope! 80 degrees in October is just wrong!)