Thursday, February 27, 2014

Cold weather recipe

This winter has been brutal in Illinois, almost to the point where I don't want to go out once the sun has set. The snow has come down really heavy and the cold has been REALLY cold. We even had cold days at work, COLD DAYS! Keith had 4, I had 2. CRAZY. Now, people have somewhat adjusted to the cold, but everyone is in a bad mood and wear way too many layers, myself included. One of those really cold nights, I reached for one of my favorite recipes. It always warms me up, and it makes me think of my mom's dad, my Grandpa L. This is his recipe for Tater Tot Casserole


What you need:
1/2 a bag of frozen tater tots
1 lb of ground beef
1 can of cream of mushroom soup (we used reduced fat)
milk
2 cups of shredded cheddar cheese

What to do:

Brown the meat. While browning the meat, preheat the oven to 350. Once you cook the meat, drain and place in the bottom of a casserole dish. Like so: 


Next, layer on half the bag of frozen tater tots-still frozen

In a bowl mix the can of cream of mushroom soup and half a can of milk together. Then pour on top the layers of beef and tater tots.

Next, add the cheddar cheese on top. Place in the oven and cook for about 30-40 minutes. I always start checking at like 20 minutes just to double check.

Pull out of the oven and eat! It really is so delicious and filling. It's not great for you, but it's not as bad as it sounds either and it really is perfect on those cold nights where all you want to do is cuddle with a blanket, drink tea and stare at the tv.

Stay warm out there kids.


Friday, February 21, 2014

Recipe: Wine Float

My friend and I joke about making wine spritzers all the time with pop added to wine. Usually I add a lemon-lime soda to my red wine to cut it and to bring up a white I like a flavorful pop, like a berry. So when Megan came over, we decided to try out some wine floats.
You need a sweet pop, we picked strawberry, vanilla ice cream and a white wine, we picked moscato. I supplied the cups and Meg supplies the cute straws!

Ice cream first! Delicious. Then add a little bit of pop. Not too much or no wine will fit in! Then fill the rest of the way with the wine.

Delicious. Enjoy responsibly.


Thursday, February 20, 2014

Recipe: Chicken Roll Ups


So when Megan came to visit me, we kind of pigged out. We would have some ice cream, then twenty minutes like some snacks, then maybe some wine. This is what happens when you can just hang out, craft and be goofy all day. So, I was starting to get a bit hungry before dinner, so I made these quick and easy chicken roll ups that I came up with one day when my pantry had too many cans of chicken, and I had no no idea what to do with them.

The recipe doesn't require much:
  • 1 can of chicken, this was too big, I would use a normal size
  • some shredded cheese, I picked mozzarella
  • one tube of crescent rolls
  • some seasoning. I use this blend, but basil is also delicious
They are also really easy to make:

First, preheat the oven to whatever the crescent roll packaging says to. I believe it was 375, but don't quote me on that. Then spray a cookie sheet with non-stick spray. Next drain your chicken and break up large chunks. I miss the seasoning with a little pepper with the chicken in a bowl.

Unroll your crescent rolls and break them apart. I find it's easiest to line them up on a separate tray from the one I am cooking on.

Lay a layer of cheese down. You can put as much or as little was you want.

Next add some chicken on top of the cheese.

Roll it up. and repeat. Bake for the amount of time on the crescent tube. and when you pull them out, you get delicious and easy chicken roll ups.


Enjoy!


Monday, February 17, 2014

Valentine's Float


I'm a little late to the party. Apparently Valentine's Day was last Friday. I spent it at work, then last minute cleaning, and finally with Keith and Megan! But anyway, Keith came in the door with a bottle of wine and flowers yelling Happy Valentines. I got him a nerf gun and coffee. True.LOVE

I am a big fan of ice cream, so we made this Valentine's Float. It's really easy and realllllly tasty.

Put two scoops of ice cream into a cup, fill the rest with cherry 7Up. Top with whipped cream and a cherry. DELICIOUS!


Thursday, February 13, 2014

How to: fabric button bracelet

You guys! Today we hit our 1000th blog view!!! How exciting! and what's more excited then that? TOMORROW, Megan is coming to visit me. So that means the two lovely ladies of this blog will be together again! (even if just for a weekend) I am so excited. A weekend of crafts and fun catching up. I cannot wait.

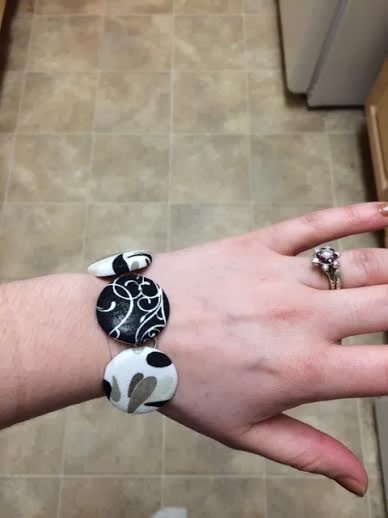
I have been really missing crafting and creating lately. I used to make so much jewelry, but lately I have found it hard to get started and really uninspired. But! This week I finally had a great idea for a different type of bracelet. I kind of loved how it turned out. I plan on making more and in bright colors. But I thought I would share this easy bracelet with you all. So, let's get started.

I know you are asking, "Oh man, Jenn that is cool. How can I make it?"
Well, it's easy!!!

You need:
  • A fabric button kit, large size
  • a chain bracelet blank 
  • Strong glue
  • fabric (not pictured)
  • pliers (not pictured)
Use your pliers to remove the part of the button that is sticking out. I found it easiest to squeeze the inside part and pull out the loop from the top. Repeat with all 6 buttons in your button kit.

Cut the fabric you want to size given to you on the button kit box. My template was located on the back of the box. It will usually say where it is in the kit.


Then take the fabric and place it pattern down in the plastic mold. Place the rounded top of the button down next. Let the fabric bunch, and between the fabric bunches and the rounded part of the button lay the bottom of the button down.

Then push down hard.

Continue to you get all your buttons done. I did 6 since my bracelet had 12 blanks, so two blanks per button.

Then glue on each button. Again, 2 blanks per button.

Let it dry face down. It took a few hours.

Finished product!

Sorry, I am trying to figure out my camera. My photos are too dark, but I hope you get what I was trying to show.

Happy crafting!


Sunday, February 9, 2014

Recipe: crockpot pork chops

You guys! I made the best dinner ever yesterday. So, Keith has been REALLY busy this semester with his promotion at work and a harder semester at school and now, his show got picked up for another run; we barely see each other!So, I haven't felt like cooking much for just one and I have been making easy food. So, this weekend I wanted to try something new (and still easy)


Okay, I didn't take any photos of the making, just the finished product. So, here's what you need!


  • 4-6 pork chops (I got boneless)
  • 1 can of cream of chicken soup
  • 1 can of chicken broth (we got organic, low sodium)
  • 1 packet of brown gravy
  • 1 packet of onion soup 
  • Crockpot


Put the pork chops in the bottom of the crockpot.  In a bowl, mix the other ingredients together until its all blended. Pour the mixture over the pork chops. Cook in the crockpot for about 8 to 10 hours on low, or until the pork is tender and ready to fall apart. I cooked ours for 8 hours on low. Then I also served with homemade mashed potatoes and zucchini.  Of course use the gravy from the crockpot on top of the mashed potatoes. DELICIOUS.

Keith said this is one of the best meals I have ever made and it was so so so easy.

Anyway! Enjoy.

Saturday, February 8, 2014

D.I.Y. Fun Washi Pencils

Wow, how has the time slipped by? It's been awhile since I posted. The last few weeks have been what I called "Birthday weeks" so I have been busy, do a lot of nothing but eating cake. BUT, I am back! and this time with a super simple d.i.y. to make your office supplies stand out.


I should give you some background, I am a coordinator at work. This means, my office is sometimes seen as the hub of my team. This also means when they need any office supply, they come in to ask me to borrow it. Sometimes I see it back, sometimes not. So, once I started to noticed my pens disappearing, I bought those obnoxious colored duct tape flower pens. So far, they have stayed in my office. I am going to try something similar with pencils.

Okay, you ready for this super hard D.I.Y? What do you need:


  •  A pair of scissors
  • pencils
  • Washi tape 
First things first, grab your tape and put the tape snug against the metal part.

Roll tape out, until it gets the end of the pencil and cut with scissors as close to the end of the pencil as possible.

Carefully push the strip of tape down, so it covers the pencil. My tape didn't fit all the way around, it only took up about half of the pencil diameter, so I need a second strip. Be careful while pushing down to get out any folds, bumps, etc.

Repeated on the second strip.

Make sure there aren't any bumps, folds or awkward line up for the two pieces of tape.

There you have it:

Fun new pencils that hopefully no one will steal :) enjoy!!!!